How to Surgically Manage Cryptorchid Dogs—A Practical Limited Paramedian Approach in Male Dogs
D. Smeak
Veterinary Clinical Sciences, Colorado State University, Fort Collins, CO, USA
Introduction
- Objectives of the presentation.
- Present an alternate approach for limited access to the caudal abdomen in male dogs.
General Key Points
- Technique advantages.
- Easy, quick method to access the caudal abdomen in male dogs.
- Allows continuation of exploration outside abdominal cavity along inguinal region to scrotum, if needed.
Technique Limitations
- Only allows limited access to caudal abdomen.
- May cause more hemorrhage in abdominal wall compared to midline approach.
- Key point: Surgeon must be certain that further exploration of abdomen will not be required before attempting this approach. Further access to abdominal cavity from the paramedian approach will cause unnecessary tissue dissection and bleeding.
Key Anatomy Points
Between the umbilicus and the pubis, the external rectus sheath is comprised of fused fascia of the external and internal abdominal oblique muscles, and the transverses abdominis muscle. On the lateral half of the external rectus fascia there are 2 separate fascial sheets (the fused fascial sheets of the abdominal oblique muscles, and the fascial sheet of the transversus abdominis muscle. In this area, there is no internal rectus fascia deep to the rectus abdominus muscle but there is a thin layer of peritoneum present. The caudal superficial epigastric vessel runs medial to the nipples as it runs forward to supply the prepuce, superficial inguinal lymph node, and mammary skin. The deep epigastric vessel runs about 1–2 cm lateral to the linea alba just deep to the rectus abdominus muscle. Smaller branches of this vessel course both lateral and more superficial in the muscle.
Technique
Step 1
With the dog positioned in dorsal recumbency, place a towel clamp on the prepuce (if a urethral catheter is not expected to be used in the procedure) and clamp it to the skin on one side of the body (the side opposite the side of your intended abdominal approach). If you expect that you will need access to the urethra (e.g., to flush urinary calculi from the urethra) thoroughly irrigate the prepuce with antiseptic solution and position the prepuce within your sterile field.
Step 2
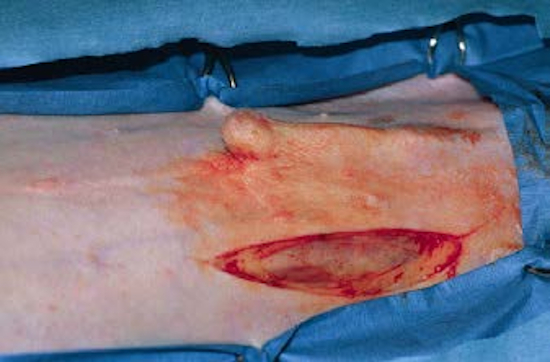
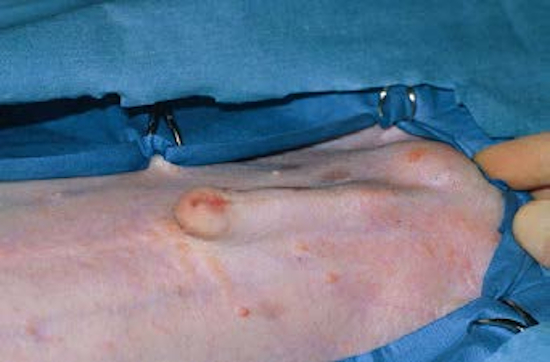
Create a skin incision about 1 cm parallel and lateral to the nipples from the level of the cranial aspect of the prepuce to about 3–4 cm cranial to the pubic bone (palpate this landmark under the skin). Avoid the caudal superficial epigastric vessels, which run longitudinal and parallel to nipples.
Step 3
Incise through the subcutaneous tissue and ligate or electrocoagulate small lateral branches of the epigastric vessels. Once the rectus fascia is visible, locate the lateral edge of the rectus muscle (this is seen as a line between the whitish fascia of the rectus muscle and the more reddish-appearing external abdominal oblique muscle).
Fig1
Step 4
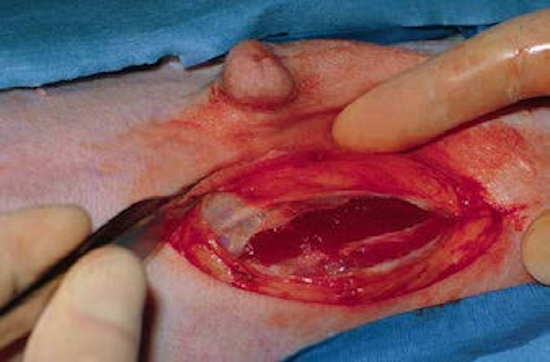
About 2/3 the width of the rectus muscle from the linea, make a stab incision parallel to the linea in the external rectus fascia. Undermine the rectus fascia parallel to the linea and make an incision in the fascia (you will cut through two separate layers of fascia) with Mayo scissors the length of the original incision (do not incise underlying muscle yet).
Fig2
Step 5
At the same level as the rectus fascia incision, bluntly create an opening into the peritoneal cavity with mosquito forceps. Grasp two mosquito forceps, one in each hand, place the tips of the forceps in the wound, and spread the forceps in the direction of the muscle fibers. This will bluntly open the abdominal cavity without cutting muscle tissue, which will reduce tissue trauma and bleeding. If the deep epigastric vessels are accidentally disrupted, ligate the bleeding vessels with chromic catgut sutures.
Step 6
Bluntly break down any peritoneal attachments with your fingers. The abdominal exposure is complete. Place laparotomy sponges along the rectus edges and insert abdominal retractors (Balfour retractors work fine here) to help isolate the problem area.
Abdominal Ectopic Testis
Step 1
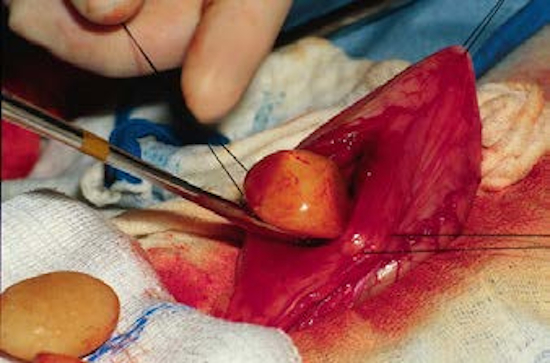
If the surgery aim is to remove an abdominal ectopic testis, find the ductus deferens and follow this structure to the testis.
Fig3
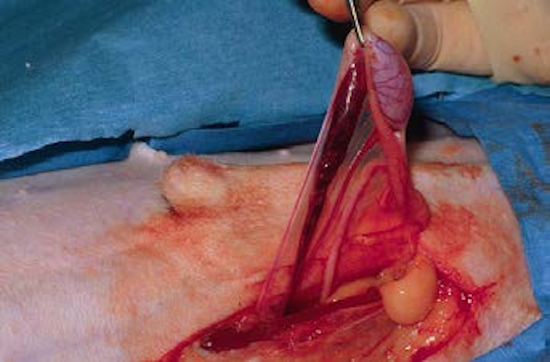
Alternately, the testicular artery can be used to locate the testis. Remove the testis by separately ligating the testicular vessels and ductus with absorbable suture material or vascular occluding clips.
Fig4
Perform routine castration for testicle in normal scrotal location.
Fig5
Step 2
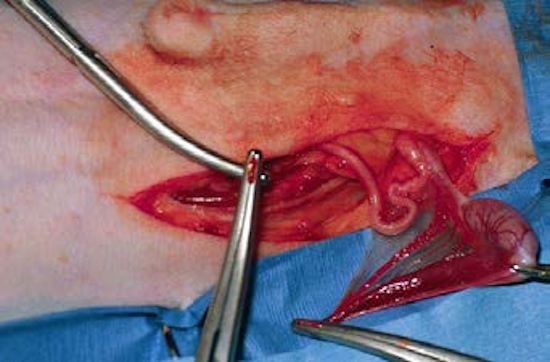
If the ductus is followed to the inguinal ring (this means you did not detect that the testicle is outside the abdominal cavity), first gently pull on the ductus to determine if the testis is in the ring—if it is not, bluntly dissect external to the inguinal rings to find the spermatic cord. Dissect along the cord until the testis is found. The original skin incision is easily enlarged caudally to help expose the area between the inguinal canal and scrotum if the testicle is located in the subcutaneous tissue caudal to the original incision area. Routinely ligate and remove the ectopic testis.
Step 3
If the opposite testicle is intra-abdominal, this can be reached through the same approach (follow step 1 again).
Urinary Calculi Removal through Paramedian Approach
Step 1
Isolate the bladder with moist laparotomy sponges. Place your stay sutures at the ends of the proposed bladder incision site.
Step 2
Create the cystotomy.
Fig6
Step 3
Run an appropriately sized, soft, red-rubber urinary catheter normograde and retrograde up the urethral orifice and cystotomy incision to remove residual calculi.
Step 4
Close the cystotomy routinely.
Closure of the Approach
Step 1
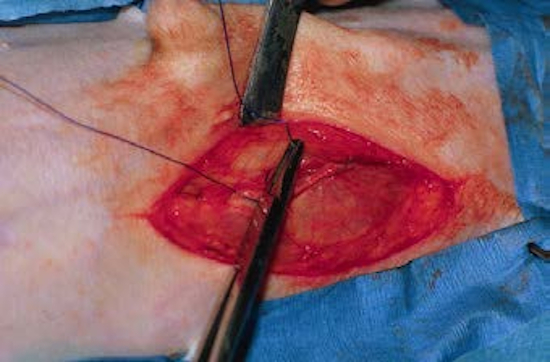
Perform a sponge count and remove all pads and instruments from the abdomen. There is no need to close the peritoneal layer or muscle.
Step 2
Close the external rectus fascia (both fascial sheets) in one layer with either a simple interrupted or simple continuous pattern. Prolonged absorbable sutures are recommended for closure.
Fig7
Step 3
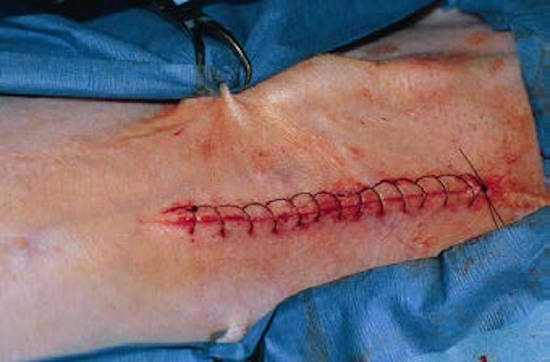
The subcutaneous tissue and skin are closed routinely.
Fig8

Fig9
Aftercare
Strict confinement after surgery is recommended for 2 weeks.
Monitoring
Monitor the wound for any evidence of infection, fluid accumulation, or breakdown.
Fit an Elizabethan collar on the patient if extra wound protection is necessary.
Complications
Just like for the standard midline approach to the abdomen in dogs, bruising or seroma formation occasionally occurs due to ineffective subcutaneous dead space closure or poor hemostasis.