N. Clancey
Pathology & Microbiology, Atlantic Veterinary College, Charlottetown, PEI, Canada
Advantages of performing fine-needle biopsy for cytology include quickly obtained samples, often without sedation or general anesthesia, the procedure is minimally invasive, relatively inexpensive, and preparation, staining and interpretation are often rapid. The limitations of cytology include the lack of architecture compared to histology, it is not always possible to distinguish between reactive, dysplastic and neoplastic changes or to determine the type of neoplasm, the expertise of the examiner (experience helps avoid pitfalls) and the relatively increased frequency of non-diagnostic samples. This latter reason is often a source of frustration for clinicians causing them to avoid using cytology as a diagnostic assest.
Reasons for Non-diagnostic Samples
1. Hypocellular sample
- Anatomic miss—Needle may have passed directly through or is adjacent to the area of interest.
- Insufficient vacuum pressure in aspiration techniques.
- Cells encased in a fibrous matrix in mesenchymal-based lesions. A non-aspiration technique may be more useful in these cases.
- Cells wash off slides during processing—Especially with adipose cells from lipomas.
- Slides are not dry prior to staining—Material washes off during staining.
2. Ruptured cells
- Needle bore too small—Creates excessive frictional force when aspirating.
- Excessive vacuum pressure—Creates excessive friction.
- Sample dried prior to smearing—Cells adhere to the slide. Placing another slide on top and dragging it away for smear preparation is like moving an anchored ship—something has to give!
- Excessive smearing pressure—When using a slide-over-slide smearing technique, no downward pressure should be placed on the smearing slide.
- Some cells are fragile. Neoplastic lymphocytes can be quite fragile, particularly with previous corticosteroid therapy. Sample collection should be performed prior to drug administration whenever possible.
Site Preparation Prior to Sampling
Often, little is required other than prepping with alcohol. However, give thought to the anticipated lesion and whether you wish to perform culture and sensitivity testing. Is the lesion a possible abscess? If yes, it is ideal to clip and surgically prepare the overlying skin to help avoid possible normal skin flora contamination. When performing ultrasound guided samples, be cognizant of how much ultrasound gel is present. It stains dark purple with standard stains and can completely obscure sample details.
Equipment
- 22- to 25-gauge needles are ideal. Larger bore needles essentially result in a core biopsy collection. This decreases numbers of individual cells and increases cell cluster density, often making interpretation impossible. Larger bore needles also increase blood contamination potential, decreasing diagnostic potential.
- Syringes: ~3–20 ml
- Extension sets and butterfly catheters—Often used with ultrasound guided samples allowing for precise needle control. If negative pressure is required, an assistant can perform this without disturbing the needle and/or the ultrasound probe.
- Slides—Ideally with a frosted end for labelling and bevelled edges for making blood smear-type smears.
- Tubes—Plain and EDTA tubes for most fluid samples.
- Pencil or solvent-resistant marker for labelling slides.
- Clean flat surface and space allowing for well-orchestrated smear preparation.
- Hair dryer—Air drying slides is often sufficient. In some instances, low heat from a hair dryer may improve diagnostic quality, particularly with lipomas and bone marrow aspirates.
Technique—Aspiration Versus Non-aspiration
- An aspiration technique does not always obtain cells from very firm masses. Aspiration usually is better suited for fluid-based lesions and lesions anticipated to exfoliate easily.
- The goal of a non-aspiration technique is to create a cell slurry by rapidly and repetitively advancing and withdrawing the needle along a single path within a lesion. Redirect without entirely removing the needle and repeat. Cells travel up through the needle with each forward thrust. Some cytologists prefer performing only one needle advancement before redirecting. The technique can be performed with or without an attached syringe. When using a syringe, fill it with air prior to introducing the needle into the lesion.
Impression Smears Prepared from Histological Biopsy Samples
- Cut a fresh surface of the biopsy specimen for imprinting. Only a small (~0.5–1.0 cm2) representative piece is required.
- Blotting the piece on gauze or tissue paper prior to making impression smears to remove excess blood is a key step.
- Lightly touch the freshly cut surface to the slide and then lift directly vertical, avoiding horizontal smearing.
- Repeat several times, forming 1–3 rows of individual impressions along the slide.
Slide Preparations
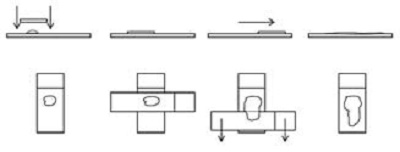
1. Squash, slide-over-slide or smear technique
- Generally, the best method for most lesions.
- Goal is to prepare a thin film with cells spread in a single layer without rupturing cells.
- Squash is a misnomer as no or minimal downward pressure should be applied to the top spreader slide during smearing.
Figure 1
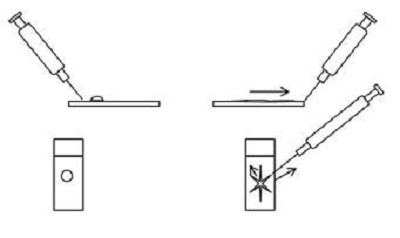
2. Starfish or needle technique
- Involves dragging the ejected material on the slide peripherally in several directions using a needle.
- Relatively gentle on cells but often leaves thicker areas along the centre of the starfish arms, which may be too thick for review.
- Needs a certain amount of fluid to allow spreading and should be performed quickly prior cells drying and adhering to the slide.
Figure 2
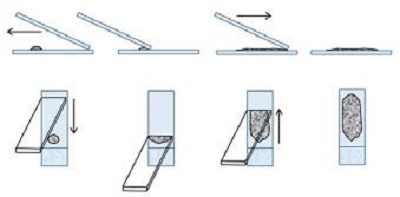
3. Blood smear technique
- Most appropriate method for fluid samples.
- Requires enough fluid for proper smearing.
- Cell rupture is minimal except at the feathered edge.
- Chamfered cornered bevelled edged slides are ideal.
- Spreader slide is tilted between a 30–45 degree angle and pulled back into the ejected material. The spreader slide is then smoothly and rapidly glided forward. The smear should end at least 1 cm from the opposite end of the slide as some automated stainers do not stain the entire slide.
Figure 3
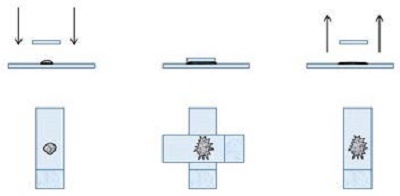
4. The touch and go technique
- Similar to the squash preparation but without the smearing component.
- Performed by placing a slide on top of the sample then gently lifting it off. Typically only the surface tension is used; slides are not squeezed together.
- Provides a rough combination of the squash and starfish methods.
- Generally, this produces a mixture of areas where cells lay out well and thicker areas that may be difficult to evaluate.
Figure 4
Random pearls and suggestions
- Prepare and submit multiple slides—Sample volume and quality varies between slides.
- Avoid blood contamination as much as possible, understanding that some lesions are vascular or blood-filled. Iatrogenic blood sources are often due to larger bore needle selection and/or prolonged aspiration. Extremely bloody fluid samples can be placed into EDTA and plain tubes, then several smears can be prepared controlling the drop size using hematocrit tubes.
- Avoid slow, shallow needle passes when using a non-aspiration technique.
- Firm masses (mesenchymal tissue) often require more vacuum pressure facilitated by a larger syringe.
- Be well organized—Pre-label slides and make smears promptly. If cells prematurely dry, they rupture once smearing is attempted.
- Avoid ejecting material well above the slide such that numerous droplets splatter onto the slide. Place the needle bevel downward to contact the slide and eject material with a smooth rapid plunger depression.
- Fluid sample submissions should include samples in EDTA and plain tubes and 1–2 air-dried unstained blood smear style smears.
- For cerebrospinal fluid, if a delay of >24 hours is likely prior to reaching the laboratory, the sample should be separated into two aliquots. These consist of one unaltered aliquot for total protein and cell counts, and one containing 20% fetal calf serum or 10% serum from the patient for the differential cell count.1
- With cystic skin masses, attempting to sample the cyst wall is encouraged. Also, draining as much fluid as possible and re-sampling any solid areas may improve obtaining cells. Many epithelial and follicular lesions will not yield diagnostic material from the central cyst; the wall is typically more rewarding.
- For clear colorless fluid samples, prepare a line smear (rather than blood smear style) to help concentrate cells along a thin line.
- Provide an appropriate history and description of the lesion(s) being submitted. For skin masses, noting if they are cutaneous or subcutaneous is important.
- Avoid tape or sticky slide labels—Often difficult to remove and remaining glue fragments absorb stain, inhibiting proper staining.
- Avoid refrigerating prepared slides—Condensation destroys cells.
- Avoid contact between slides and formalin or formalin fumes which will partially fix cells and markedly interfere with staining. Formalin fumes will penetrate most containers, even screw-top jars sealed in plastic bags. Use only approved leak-proof containers and package appropriately.
- Use solid slide holders. Stiff cardboard holders bend under pressure and slides may break. Additionally, thicker slide preparations often make contact with the closed lid of cardboard mailers, allowing a portion or the entire sample to wick into the cardboard.
- Mast cell granules stain poorly with Diff-Quik type rapid stains, potentially leading to erroneous diagnoses in inexperienced hands.
- Laboratories can over-stain previously quick stained slides received but it is optimal for unstained slides to also be received. Reviewing your own slides prior to submission and comparing findings from a board-certified clinical pathologist is excellent free continuing education.
References
1. Fry MM, Vernau W, Kass PH, Vernau KM. Effects of time, initial composition, and stabilizing agents on the results of canine cerebrospinal fluid analysis. Vet Clin Pathol. 2006 Mar;35(1):72–7.
2. Barger AM, MacNeill A. Small Animal Cytologic Diagnosis. 1st ed. Boca Raton: CRC Press; 2017.
3. Cian F, Freeman, K. Veterinary Cytology. 2nd ed. Boca Raton: CRC Press; 2017.
4. Raskin RE, Meyer D. Canine and Feline Cytology: A Color Atlas and Interpretation Guide. 3rd ed. St. Louis: Elsevier; 2016.
5. Valenciano AC, Cowell RL. Cowell and Tyler›s Diagnostic Cytology and Hematology of the Dog and Cat. 4th ed. St. Louis: Elsevier; 2013.