Herman A.W. Hazewinkel, DVM, PhD, DECVS, DECVCN
Dept. Clinical Sciences of Companion Animals, Utrecht University
The Netherlands
INTRODUCTION
Bandages are applied to cover and treat wounds, to prevent (post operative) swelling or to treat fractures temporally. Splints are applied to refer or allow to recover patients with fractures in order to prevent additional tissue damage, to treat fractures in well defined cases or as support in a variety of occasions including after repositioning, arthrodesis, fracture treatment, tendon suturing, carpal laxity. When one has experience with a certain material it is no use to change, since it may cost some time to build up experience. Bandaging looks quit easy but when not tight enough the animal will loose the bandage and when too tight it may cause serious complications. In the first part bandages and in the second part some splints will be discussed. Where dogs are mentioned, it is also applicable in most cases for cats and other companion animals.
Distal extremity
Indications: covering wounds, stop bleeding, protect unnailed toes, protect sutures
Material: cotton, hydrophilic bandage, adhesive tape
Technique: The dog is put in lateral recumbency with the affected leg up, while the elbow joint is fully extended or the stifle joint half-extended during the bandaging procedure. Stripes of cotton are put between the toes and (don't forget Ph1!) and cotton is spirally twisted around the leg from distal to proximal. hydrophilic bandage material is twisted likewise from distal to proximal, leaving approx. 2 cm cotton sticking out of the bandage. Than the gauze is twisted quickly and not tight from proximal to distal, and the covering from distal to proximal is repeated; each twist is covering the previous one for 1/2 or 2/3. When it necessary to cover the distal end, three flaps of gauze are made from dorsal to plantar and visa versa starting at the proximal end of the Mcc or Mtt bones followed by some circular coverage's from distal to proximal. Finally, the bandage should look and should sound, while tapping on the bandage, evenly all over the bandage without irregularities. If not, additional circular coverages from distal to proximal are made. At the end, with adhesive tape the bandage is finished and/or a distal coverage with adhesive tape is made: this 'shoe' can withstand more friction and more pollution than bandage material. The bandage should be changed every 3-4 days.
Elastic bandage to prevent/treat swelling
Indication: postoperative bandage (after joint or long bone surgery) to protect for oedema or hematoma formation, support treatment of lymphadenitis
Material: sterile gauze, elastic bandage which sticks to itself, cotton or artificial cotton material, adhesive tape
Technique: In most cases only elastic bandage is applied, but in case it should stay longer than 3 days, as a first layer (artificial) cotton is applied. Since the adhesive, elastic material is fixed to itself on the row, it should be unrolled before applied on the leg: bring bandage on the leg (or cotton), unroll for 1/2 the circumference of the leg, pull slightly on the bandage and put it on the leg, change hands and unroll with the other hand 1/2 the circumference, stick it to the former layer for about 1/2 or 2/3 and than continue with the 'first hand' et cetera. It is very important to pull on the elastic bandage equally and to put it with the same light elasticity on to the leg; when more than 1/2 the circumference is unrolled there is the tendency to pull too hard i.e., to bring too much elasticity on, whereas when it is unrolled right from the roll the adhesive force applied by the manufacturer determines the elasticity applied on the leg, which it not per se what is needed and not even at all.
When applied on a hind leg (e.g., after stifle joint surgery) the leg is hold in a natural position (extended just proximal of the stifle joint) while the paw is positioned against the belly of the surgeon: now the leg is in a natural position with tension on the Achilles tendon. When the bandage is applied in this position, there will be no pressure at the calcaneus and the dog may walk not hindered by the bandage. To overcome the tendency of the bandage to slip in a distal direction from the hamstring muscles. The bandage goes from the proximal tibia as proximal over the femur as possible, is fixed there by the assistant who extends the leg and the bandage is then laid down in 2-3 circles around the still uncovered skin in a distal direction. When the skin is covered with the (self sticking bandage) a second layer is applied from distal to proximal. Finally, at the proximal edge the bandage is stuck with adhesive tape to the skin (in a way it will not act as a ligature!) and the end of the bandage is covered with adhesive tape in a longitudinal direction in order to make maximal use of the elastic characteristics of the bandage and not making is inelastic with adhesive tape.
(Modified) Robert Jones bandage
Indication: stabilisation before or after surgery of a fractured leg distal of elbow or stifle joint
Material: much cotton, gauze and adhesive tape, thermoplastic material.
Technique: As discussed under 1. cotton is applied between the toes and around the leg in 3-4 thick layers as proximal as possible and than covered tightly with hydrophilic gauze. By doing it tightly, the bandage will be stiff. Additionally, rigidity can be increased by adding 4 wooden or aluminium stripes in the bandage equally divided around the leg or a band of thermoplastic material, which is moulded around half the leg (caudal in case of the front leg, cranial in case of the hind leg) when warm and becoming rigid when cooled down. To prevent slipping of the bandage, adhesive tape can be applied in a longitudinal direction (from distal to proximal) at the lateral and medial side of the leg before the cotton is applied, is left in place on the role till the bandage is completed and than twisted180 degrees and stacked to the outside of the bandage. A less massive bandage allows the animal better to accept the bandage and move around in its cage, therefore the modification of the original R.J.-bandage with only (much) cotton is not often in use.
Body splint
Indication: stabilisation of pathology proximal of the proximal 1/3 of the radius (radius ulna, humerus or spinal fractures, aftercare of luxation of elbow or shoulder joint.
| Figure1. | 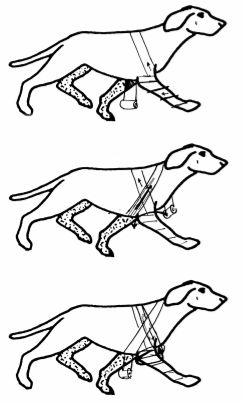
Sequence of layer to construct a body splint |
|
| |
Material: cotton hydrophilic gauze, adhesive tape, a strip of wood, aluminium or thermoplastic material of the length of the extended front leg from the tip of the toes till the edge of the scapula.
Technique: The dog is in lateral recumbency, affected leg up and extended in a cranial direction (since the leg is extended, the leg is longer than the front leg of the other side and thus will hinder the animal when it is not fixed in a cranial direction). After applying the stripes cotton between the toes, the leg is in a spiral way covered with cotton clockwise in case of the left leg and anti-clockwise in case of the right front leg, till the axillary region: than the cotton is fixed with gauze applied in the same direction. The cotton is now applied around the thorax: the dog is lifted from the table, the cotton goes from the proximal antebrachium around the tip of the scapula, around the thorax and comes to lateral again just caudal of the treated front leg (Figure 1 top); from there it goes in the direction of the lower cervical region, around the neck and than behind the olecranon (Figure 1 bottom), through the axillary region, back to the scapula and from there it will be surrounding the thorax and neck another 2-3 times till the whole region is covered with cotton. Than the role of gauze is picked up again, and the cotton is firmly attached to the body with it. A stick of the length of the entire front leg is applied to the lateral side of the cranially extended leg and also fixed in place with hydrophilic gauze. When thermoplastic material is used (3-4 layers firmly attached to each other when warm to form a firm strip), it is take a little longer that the length of the leg in order to mould it around the proximal edge of the scapula and thus prevent it from slipping distally. For wooded (and other) stripes, slipping distally should be prevented by cover the distal paw as described under 1. The bandage, when correctly applied can stay in place during 7-10 days. It should be protected against wet and dirt, and the animal should be restricted as well.
Splinting of front leg
Indications: instability distal from the proximal 1/3 of the radius (e.g., radius-ulna or Mcc fractures, instability of the carpal joints). Open fractures and open wounds are a contraindication for its use. Instable fractures (even closed) are a contra indication, i.e., only in stable and closed fractures. This may include oblique fractures of radius or tibia when respectively, the ulna or fibula is still intact and thus splinting the fractures bone internally.
Material: thin cotton, plaster of paris or any modern equivalent of it, hydrophilic or elastic gauze, adhesive tape. The advantage of plaster of paris is that it is easy to mould around the contours of the leg, is not aggressive for the skin and is quit resistant against loading forces. Its disadvantages are that it is not resistant against humidity and it does hardly allow for X-ray penetration, i.e., radiological control of fracture healing. New types of plasters are often aggressive for the skin of the veterinarian and the patient alike, are more expensive but do not disintegrate in water and allow for radiological control. Thermoplastic material is NOT used in these occasions, since it does not follow the contours of the leg and thus allow for micro-movements and may disturb the repositioning or fracture healing. They are used to support legs in case of carpal laxity, arthrodesis, tendon repair etc. Wooden sticks or plastic spoons have the disadvantage that the leg is adapted to the stick or splint, whereas with the other mentioned materials the material is adapted to the contours of the leg; so for first aid and transport to the place of definitive treatment they can be used, but are otherwise obsolete.
There has to be taken into consideration that 1) the leg may swell due to haematoma formation, oedema and trauma by the accident and the repositioning procedure; 2) the splint will neutralize forces and thus prevent shifting of the fracture ends; 3) the splint should be easily removable or renewable and not may not require special equipment doing so.
Considerations: The following considerations should be realized. The rigid material should cover the entire leg from its most distal point (point of toes) up to the joint proximal of the fracture site (i.e., including carpal and tarsal joint in case of Mcc or Mtt fractures, respectively and including the olecranon and tibia tubercle in case of fractures in the distal 2/3 part of radius (& ulna) or tibia (& fibula), respectively.
We advocate the use of a hemi-splint, i.e., half-round covering the leg (Figure 2), whereas the rest is covered by cotton. The advantages are: 1) this construct allows for swelling (due to hematoma, oedema) and shrinkage afterwards; 2) it gives support where it is needed; and 3) is easy to remove; and 4) is not too heavy for small companion animals.
Since the ulna is longer than the radius, its course is more superficial than the radius and the antebrachium needs the support from the caudal side, the splint is applied at the caudal half of the antebrachium (Figure 2). When the rest in the fracture are is not disturbed by movements of the toes, the splint is as distal as the last phalanges of digit III and IV, allowing for some weight bearing of the nails of these 2 toes, and thus some movement and venous return.
| Figure 2. | 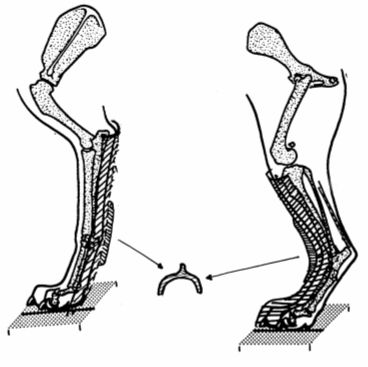
Plaster of front leg and hind leg |
|
| |
Since the tibia is located at the cranial part of the crus (and caudally only the Achilles tendon is located), the splint is applied at the cranial half of the crus in case of tibia fractures. To prevent damage to the toes by a too short splint in case of weight bearing, the splint is made till the nails of the toes of the hind leg.
Cotton is covering the leg where the splint material is not covering the leg, thus allowing for swelling and shrinking of the leg while leaving the splint good in place and giving uninterrupted support to the repositioned fracture. Some cotton is applied underneath the splint, only to prevent pressure soars to develop; too much cotton underlayer will allow the fractured fragments to move within the surrounding splint and thus delay or disturb fracture healing.
Technique splinting front leg
After repositioning of the fractures bone(s), the leg is extended. In certain cases it can be practical to hang the fractured leg on a string which connects toes and e.g., a stand or surgery lamp to extend the leg and relax the muscles before repositioning. The dog is than laying under anesthesia at the fractured side, half way rolled on its back. The leg is covered with a thin layer of cotton or foam, especially in the area of bone protuberances (Os accessorium, styloid, tip olecranon). For a medium size dog, 6 strips of plaster will be place to each other, made wet in a basket with water of the temperature according to the instructions of the manufacturer, compressed equally and than applied at the right place (from toes to olecranon, not too much proximal, and equally lateral and medial). When still wet, the plaster is temporarily fixed with gauze, until it is hard (2-4 minutes); than the gauze is removed. With a pair of scissors the edges of the splint are trimmed in a way that at least 1/3 of the surrounding of the antebrachium is free from plaster. A cotton layer is applied at the dorsal aspect. Both cotton and plaster are surrounded by gauze from distal to proximal.
Technique splinting hind leg
Likewise, a strip of sufficient layers of plaster, wet and compressed is applied at the dorsal aspect of the hind limb (Figure 2) after a thin layer of cotton is applied with extra care for the malleoli. An extra elevation can be contracted in the plaster at the location of the tarsal (respectively carpal) joint to gain stiffness without adding too much weight. Here the distal edge of the splint should definitively cover the toes. After trimming the edges of the splint, the uncovered leg is covered with cotton, respecting the physiological contour of the Achilles tendon. After applying the splint, a control radiograph will be made to check for sufficient repositioning. When the splint should be removed, the gauze can be cut, the cotton removed and the splint bended open. In case the fracture is (perhaps) not expected to be healed, it is wise to perform this removal under anaesthesia to prevent withdrawal of the leg by the animal while the leg is partly in the splint and thus with the chance of fracturing the newly formed callus.
Figure 3. Different layer cover the antebrachium (left) and the crus (right), in case of:
|
Robert-Jones bandage
(much cotton,
tight gauze) |
|
|
Modified Robert Junes
bandage
(less cotton, enforcement,
gauze) |
|
|
Plaster of Paris, cotton
and gauze |
|
|
Plaster of Paris
and elastic bandage |
|
Aftercare
The aftercare should include keeping the bandage dry and clean, keeping the animal quite as would have been done with a child with a broken leg, depending on the mobility the animal should be supported by standing up, prevention to walk on slippery surfaces, to urinate and defecate and in some instances even to eat and drink. The owner should be instructed that as soon as the animal has a change in behaviour (chewing on the bandage), in using the leg, in temperature of unwillingness to eat, that this may be an indication of soft tissue damage and that the animal should come back to the practice the same day. The bandage should stay dry, clear and in its place, and toes (when visible) may not increase in size (reflecting swelling due to squeezing).