INDEX
Preparing for a Webinar
- Turn off notifications. You don't want your calendar beeping and popping up with a reminder that you have class. While the participants won't see your pop-up notification, they will hear the beeping noise. So silence the notifications on your computer prior to logging into VIN.
-
We recommend you use a microphone headset to cut down on the background noise.
-
Make sure system updates and backups are not scheduled to run during the real time session.
Back to INDEX
30 Minutes Prior to Webinar
- Open your PowerPoint presentation.
If you have only one monitor, you might prefer to use the PowerPoint Reading View (Windows) or Individual View (Mac) in place of running the Slideshow view as this will give you room to arrange your Zoom windows without completely covering the PowerPoint display. For information on setting up PowerPoint in a window (versus across your entire monitor) and using keyboard shortcuts to navigate the PowerPoint presentation, see: Using PowerPoint in a Webinar .
- If you have other videos or materials to present, bring them up and have them ready to go.
- Your facilitator will have sent you a Zoom panelist link in an email from Zoom prior to your real time session date. Click on that link to join the webinar.
If you cannot find the zoom email, you can alternatively go to your course area and select the orange "Attend Session" button to join the webinar. If this is your first time joining a zoom webinar, you will be asked to download the Zoom app. For more information on joining a webinar, please see: Joining a Zoom Webinar Real Time Session .
- If you joined the webinar but appear to be an attendee instead of a panelist, send a message to the Q&A window to let the facilitator know you are in the webinar. The facilitator can then level you up to be a panelist.
Back to INDEX
Lecture/Audio
Panel of Zoom controls

When you first get into the webinar, check the microphone icon to see if your audio is muted or not.
Once you have verified that your audio works, please mute yourself in Zoom until it is time for you to begin the lecture.
If people cannot hear you speaking, make sure you are not muted on the webinar. Make sure your headset is not muted and the headset volume is turned up. If you need help, see: Microphone Headset - Volume and Mute .
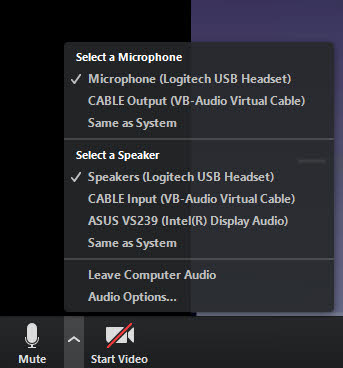
And finally, make sure the webinar is using the microphone headset device for input/output. There is a drop-list next to the Mute icon that, when selected, shows a list of the microphone devices available on your computer, make sure your microphone headset is the one selected. Please note that once you share your screen, you cannot change microphone device until you stop sharing your screen.
Back to INDEX
Chat
During the webinar, you will be able to communicate with your course facilitator via chat messages in the Zoom Chat window.

You can talk privately to a single panelist, to all panelists, or to all attendees and panelists.

If, after you join the webinar, it appears that you cannot be heard (and you are not muted on the webinar OR on the microphone headset), you can check that the webinar is using your microphone headset for input/output.
After your facilitator has finished the announcements, they will stop sharing their screen and introduce you.
Back to INDEX
Share your Screen
To share your screen, click on the green Share Screen button.

You will be shown a selection of windows that are open on your desktop, as well as the desktop itself. Select the PowerPoint presentation window (which should already be in displayed).

Unless your PowerPoint contains audio or videos with audio that you want to share with the attendees, make sure the "Share computer sound" is unchecked (bottom left of window shown above). Click on the "Share Screen" button to display the window you have selected.
Back to INDEX
Q&A - Answering Questions
Open the Q&A window by selecting the Q&A icon on the Zoom control panel.

The Q&A window has two tabs, Open and Answered. The Open tab contains the list of unanswered questions and the Answered tab contains the list of answered questions. The tab you are currently viewing will be blue (see image below).
When answering questions use the "Answer with Text" button (red arrow) even when responding to questions using audio. In order for the question text to be included in the final text transcript, there needs to be text attached to it. Please select the Answer by Text button, type in your initials, answer the question using audio, and select the Done button when finished.
- Select a question and choose the "Answer by Text" option.

- Speak the person's name and repeat the question aloud.
Speaking the person's name and repeating the question before you answer it will help us to match your answer to the question text when the session audio is transcribed.
- Type in your initials in the provided text box (see below).
- State your answer to the question.
- Then click on the Send button.

If you wanted to respond to just the person asking the question, you can answer with text (instead of verbally), select the "Send privately" checkbox before using the "Send" button.
Answered questions are moved to the Answered tab. You can add an answer to an already answered question by selecting the "Add an Answer" button.

Back to INDEX