Summary
Interlocking nails have been used in human medicine as a method of fracture fixation since 1950. They are inserted in a close fashion by fluoroscopy. In veterinary medicine, interlocking nails started to be used in the 90's, they are inserted by open fashion and the use of a jig allows us to find the holes of the nail. Some models allow us to compress the fracture line using a compressor attached to the base of the jig. The nails are usually fixed to the cortical bone with screws, but an external fixator can also be used in order to increase nail resistance.
We have used two models of interlocking nails: the four-hole nails (two holes in the proximal part and two holes in the distal part), and the multiple-hole nails (a continuous hole every 15 mm). The complications that we have observed include: nail failure (3% cases), screw failure, screw malposition, bone sequestration, nonunion, and the windshield-wiper effect. End results are bone healing in 100% of cats and 96% in dogs, and excellent functionality in 98% of cats and 92% of the dogs.
Interlocking nails started to be used in veterinary medicine in the 90's, when Dueland in the USA; and Durall and Díaz-Bertrana in Europe, independently developed prototypes and instruments for clinical application (1). Clinical studies about this fixation method for humerus, femur and tibial fractures have been performed throughout this decade. Consolidation/functionality results can be compared with those of osteosynthesis plates (2-10). Interlocking nails have also been used in the treatment of nonunion (11) and osteomyelitis (12).
Concept, Claims, and Surgical Technique
An interlocking nail is a Steinmann nail with holes, through which screws can be inserted and fixed to bone cortex. In so speaking it is an intramedullary plate. The interlocking nail nullifies all the forces acting over the fracture line, and thanks to screw fixation, it prevents implant migration that--in accordance with our opinion--is a frequent complication associated with intramedullary nails. They can be used in all types of diaphyseal fractures in the humerus, femur and tibia.
The nails we use are stainless steel nails 316L VM, and they include two components, i.e., the wick and the body of the nail. The wick contains a male screw thread that comes already set at a given pressure by the manufacturer, on the female screw thread of nail's body (See Figure 1). The wick has only one threaded hole (figure 1, arrow) through which we will fix the jig centering device. Wick diameter is 4.0 mm for 4.0 and 5.0 mm nails; and 6.0 mm for all other nails.
| Figure 1. | 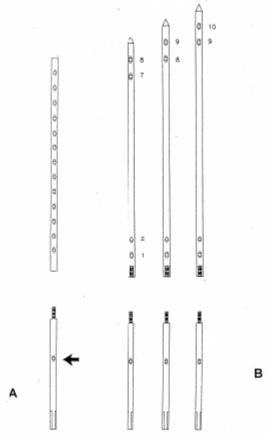
A: multiple-hole nail
B: four-hole nail |
|
| |
The body is the portion of the nail that will be implanted inside the bone. Two models exist: The multiple hole nail and the 4-hole nail (Translator's notice: which we call in Spanish a continuous hole nail, that includes one hole each 15 mm, and a discontinuous hole nail which has only 4 orifices: 2 in each nail end, respectively) (Figures 1 A and B). Nail hole diameter cannot exceed 50% of nail diameter (17).
The multiple-hole nail with continuous orifices can be cut distally using scissors in order to adapt its length to that of the bone. We must take notice of the number of orifices remaining in the nail body to avoid confusions once inside the bone marrow cavity. With the non continuous nail we choose the nail which length is best suited for that of the bone. This norm applies to diaphyseal fractures. Nevertheless, in the subtrochanteric fractures and distal fractures, we apply the nail in a different fashion (see subtrochanteric and supracondylean fractures, and Figures 9 and 10).
Once the bone has been approached, a Steinmann nail is inserted in a retrograde manner this can also be performed in a normograde manner from the trochanter fossa) in the proximal fragment (Figure 2 A), in order to make a tunnel in the bone. The proximal fragment is held so that it is maintained it in extension (in order to move it away from the sciatic nerve), in adduction (for the nail to exit as laterally as possible from the trochanter fossa), and with certain degree of internal rotation. In the event of a very proximal or a sub-trochanteric fracture, the tunnel must always be done progressively using a small diameter nail. Initially, a drill can be used until the desired diameter is obtained. While tunneling, use low rotational speed while cooling down the bone marrow cavity. In the tibia the nail must always enter in a normograde manner, medially to the patellar ligament, since if done retrogradely it can damage the meniscus or the cranial cruciate ligament. The Steinmann nail is replaced by an interlocking nail of the same diameter (Figure 2 B), and the fracture is routinely reduced. (Figure 2 C). Insertion of the interlocking nail should always be done manually using a Jacob while turning to the right, since given that both pieces are threaded in the same direction the possibility of unscrewing is prevented (actually, this has never occurred). The nail must be inserted as distally as possible (except in proximal fractures) and without crossing the femur's distal growth cartilage (in growing animals). The 4.0 mm diameter, multiple-hole nail is the most difficult one to be placed, since if forced to be inserted in the distal fragment or during the reduction, it can be bent. This nail must be handled with extreme care.
| Figure 2. | 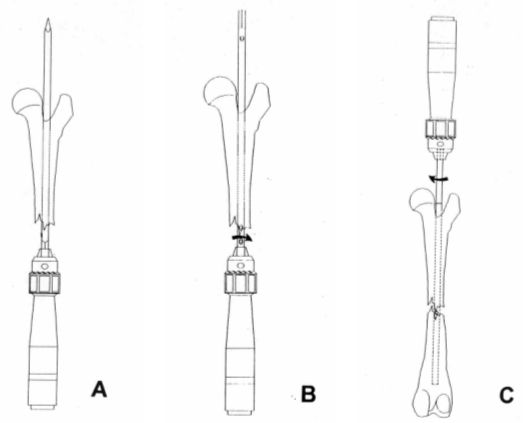
|
|
| |
The internal jig is a stainless steel piece constituted by a base with a hole through which we insert the nail's wick, and an arm with 8.0 diameter circular holes (Figure 3). Two different sizes of external guides exist: small and large. The small guide is used with the 4.0 and 5.0 mm nails (which wick has a 4.0 mm diameter). The large guide is used with all other nails (which wick has a 6.0 mm diameter). The possibility exists to adapt a gasket on the large guide (Figure 3, solid arrow) that reduces the diameter of the guide base from 6.0 down to 4.0 mm, so that this way the large guide can also be used for both the 4.0 and the 5.0 mm diameter nails. The external guide is fixed to the nail's wick through the guide centering device that is a T-shaped piece with a thread in the tip to be inserted into the threaded orifice of the wick (Figure 3, empty arrow).
| Figure 3. | 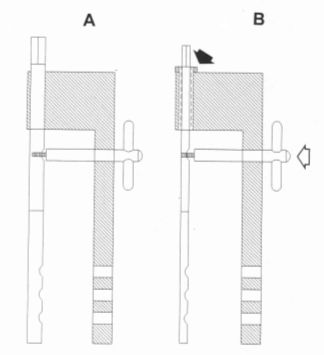
|
|
| |
Once the guide has been fixed we can know the exact position of the nail inside the bone. Due to a line with a printed arrow in the guide arm (Figure 4 B, black arrow) we can know the precise place where the two pieces forming the nail are thread-linked. This shows where the proximal end of the nail body is located. With the distal nail--if we have used a multiple hole nail cut in between hole numbers 10 and 11--the nail tip will be placed in between these two numbered holes in the arm of the external guide. In the case of a 4-hole nail with distal holes 10-11 which tip has not been cut off, the tip will be placed in the middle of one and a half holes more distal to the last hole of the nail; in other words, in the middle of hole No. 13. This is due to the fact that in all 4-hole nails, from the most distal hole to the distal tip of the nail, a distance of 30 mm exists (Figure 10). Once translated into the external guide holes, this distance corresponds to one-and-a-half holes more distal.
A drill guide is placed in one of the two holes of the guide arm, and using the corresponding drill, the bone cortex walls are perforated. The hole is first done in a proximal fragment, and the drill is temporarily left in this position. Next, a second drill/drill guide set is used to perforate the distal fragment (Figure 4 A). This step is performed in order to prevent--as much as possible--drill from slipping over the concave surface area of the bone, which could displace the guide making a hole out of the nail (Figure 4 B). The larger the arm length, the higher the chances for this complication to occur.
| Figure 4. | 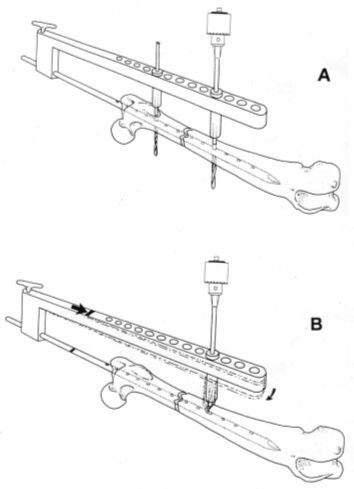
|
|
| |
Once the cortical wall is perforated the screw length is measured (shriveling is optional). Thread is made, and the relevant screw is inserted into the distal fragment. The same procedure is repeated on the proximal fragment (Figures 5, 6, and 7).
Once the nail has been fixed, the guide centering device is removed together with the external guide, and the end of the nail wick is held. Then counterclockwise rotation is practiced in order to unscrew the wick from the nail's body (Figure 8).
| Figure 5. | 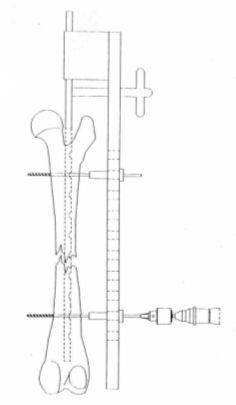
|
|
| |
| | Figure 6. | 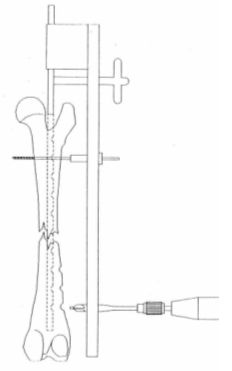
|
|
| |
|
| Figure 7. | 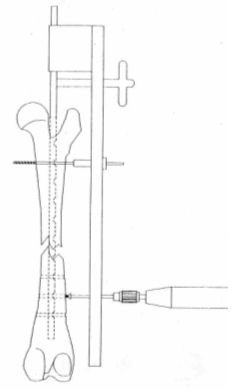
|
|
| |
| | Figure 8. | 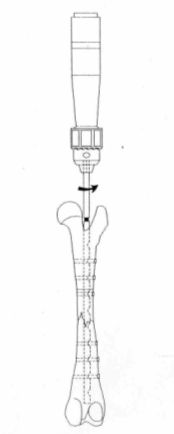
|
|
| |
|
Intramedullary nails--likewise in human medicine--should never be removed, since biomechanically torque forces are the same as those in the normal femur, and the bending forces--even if more rigid nails are used-do not affect the bone adversely during bone healing or even later (18). These nails should only be extracted if causing complications. In such event, the wick male thread is rotated over the nail body female thread and, after removing the screws, the nail is also removed. This system allows us to remove the nail even if sunk deep in the bone marrow cavity.
Femur Subtrochanteric and Supracondylean Fractures
In proximal femur fractures--if the nail is placed deeply in the trochanter fossa due to the 20 mm distance from the proximal end between the end of the nail and the first hole--many times we cannot insert a screw in the proximal fragment, since a hole in the nail body does not exist in this position. In these cases we typically use a multiple-hole nail without cutting off its distal end with the scissors. We do this in an attempt for one of the holes to match the proximal fragment. The corresponding screw is inserted into both the proximal and the distal fragments, and through one of the holes the excess nail that exits proximally through the skin is cut off with the scissors (Figure 9).
| Figure 9. | 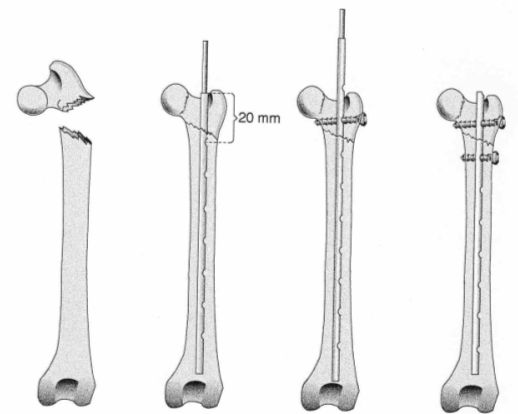
|
|
| |
As far as distal fractures are concerned, when a four-hole nail is used because of the 30 mm distance between the nail tip and the most distal hole, no nail holes exist in the distal fragment through which a screw could be inserted. In these cases a longer nail is chosen and cut as close as possible to the distal hole, allowing us to place this hole more distally, so that we can fix the distal fragment with one or two screws (Figure 10).
| Figure 10. | 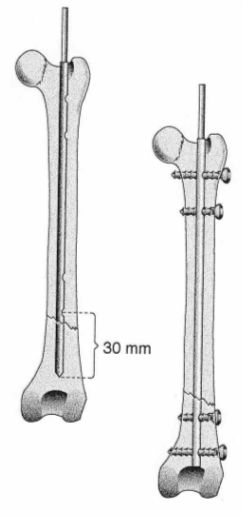
|
|
| |
Results and Complications
Bone healing rate is 100% in cat cases and 96% in dog cases. Full functionality occurs in 98% of the cats and 92% of the dogs. In 10% of the cases surgery needed to be repeated, one of them in 4 occasions and another one in 3 occasions.
Complications associated with this type of fixation are: implant fatigue (nail breakage 3%) (screw breakage) (placement of screws out of the nail (3-4%) bone sequestration, infections (fistulas), nonunion, quadriceps contracture, nail wick's thread rupture while extracting the nail with windshield wiper effect (3 cases).
Fracture Compression with Interlocking Nails
The possibility of compressing the fracture line--similar to the philosophy of compression plates using dynamic pressure--has been experimentally tested by the authors (19, 20).
After inserting the interlocking nail using the above-described technique, a metal cylinder is inserted through the nail wick all the way into the trochanter fossa (Figure 11, a). A guide with a compressor attached to its base is then placed (Figure 11, c). If a gap remains between the cylinder base and the compressor, it can be filled up using a few metal rings (Figure 11, b). Once the distal fragment has been fixed with the screws, the compressor is manually rotated. The proximal fragment is pushed against the distal fragment, compressing through the fracture line (Figure 12). Screws are placed in the proximal fragment. The reminder of the procedure is performed following the above-described technique.
This technique-that has been experimentally used in 10 Creole dogs-resulted in bone consolidation in all cases between 8 and 16 weeks. Radiologically, bone cure was observed with the formation of minimum callus or with no callus whatsoever. As far as limb functionality is concerned, al cases had full weight bearing before 3 weeks of evolution (19,20).
| Figure 11. | 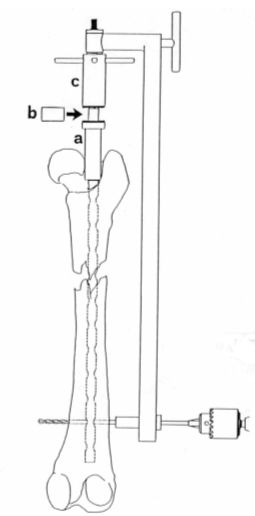
|
|
| |
| | Figure 12. | 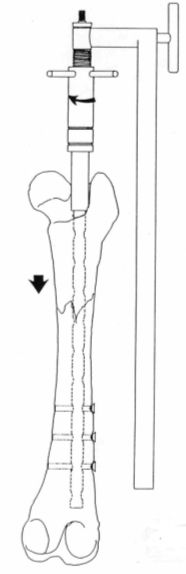
|
|
| |
|
External Fixation--Interlocking Nail Combination
One alternative that we have tried experimentally is nail fixation using external fixators instead of screws (21). This way, a part of the forces that the nail must resist is transmitted through the fixator, thus protecting it from fatigue.
We developed an external fixator which is a copy of the cortical screws (Figure 13). The surgical technique is the same as that described for conventional screws, only that the screws are replaced by external fixators (Figure 14 A). Once the nail is fixed to the bone in order to remove the outer guide, the centering device is unscrewed from the guide, and the nail wick is also unscrewed (Figure 14 B). The external guide is then extracted parallel to the external fixators (Figure 14 C). Finally, a double connecting bar is applied (Figure 14 D).
| Figure 13. | 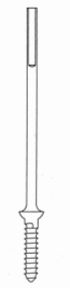
|
|
| |
| | Figure 14. | 
|
|
| |
|
In an experimental research, this type of fixation was used in two groups of beagles. In one of them (static group) this type of fixation was maintained for 20 weeks. In the other group (dynamizated group), distal fixators were removed at 4 weeks. In the static group bone curing occurred at 12.8 weeks, while in the dynamizated group this happened at 13.6 weeks. Full limb function in the static group was observed at 18-10 weeks, while this happened at 5-6 weeks in the dynamizated group with the exception of one dog. Moderate knee ankylosis was observed in 100 of the dogs in the static group between 5-8 weeks (21).
References
1. Dueland, T: History and Indications of Interlocking nail fixation. Fifth ACVS Veterinary Symposium. Chicago, 29 October-1 Novembre, 1995. pp: 279.
2. Vanozzi I, Carlucci F, Nesti S: Il chiodo blocatto de Grosse-Kempf nelle fractture diafisarie de femore nei piccoli animali: prime experience cliniche. Boll Assoc Ital Vet Pic Anim 3:53-60, 1991.
3. Duhatois, B: L´enclouage verrouillé en chirurgie vétérinaire: de la conception aux premiers cas cliniques. Prac Med Chir Anim Comp 28:657-683, 1993.
4. Duhatois B: L´enclouage verrouillé veterinaire: etude clinique retrospective sur 45 cases. Pract Med Chir Anim Comp 30:613-630, 1995.
5. Endo K, Nakamura K, Maeda H, Matsuhita T: Interlocking intramedullary nail methos for the treatment of femoral and tibial fractures in cats and small dogs. J. Vet Med Sci 60:119.122, 1998.
6. Muir P, Parker RB, Golsmid: Interlocking intramedullary nailing stabilization of a diaphyseal tibial fracture. J Small Anim Prac 34:26-30, 1993.
7. Durall I, DIaZ-Bertrana MC, Morales F: Interlocking nail stabilisation of humeral Fracturas. Initial experience in seven clinical cases. VCOT 1:3-8, 1994.
8. Durall I, Diaz-Bertrana MC: Early experience with the use of an interlocking nail for the repair of canine femoral shaft fractures. Vet Surg 25:397-406, 1996.
9. Durall I, Diaz-Bertrana MC: Clavos cerrojados en gatos: 16 casos clínicos. Pequeños Anim 20:5-23, 1999.
10. Dueland T, Johnson K, Roe SC, Engen MH: Interlocking nail treatment of diaphyseal long-bone fractures in dogs. JAVMA 214:59-66, 1999.
11. Hay CW, Johnson K: Interlocking nail fixation of an opening wedge corrective osteotomy for femoral malunion in a dog. VCOT 8:218-221, 1995.
12. Muir P, Johnson K: Interlocking intramedullary nail stabilization of a femoral fracture in a dog with osteomyelitis. JAVMA 209:1262-1264, 1996.
13. Wu C-C, Shih C-H: Biomechanical analysis of the mechanism of interlocking nail failure. Arch Orthop Trauma Surg 111:268-272, 1992.
14. Dueland RT, Berglund L, Vanderby R, Chao EYS: Structural Properties of Interlocking Nails, Canine Femora, and Femur-Interlocking Nail Construct. Vet Surg 25:386-396, 1996.
15. Diaz-Bertrana MC: Compresión de las fracturas diafisarias de fémur mediante un clavo intramedular. Tesis doctoral. Universidad de Las Palmas de Gran Canaria, 1992.
16. Durall I, Diaz-Bertrana MC, Morales I: An experimental Study of Compression of femoral fractures by an Interlocking Intramedullary Pin. VCOT:6:93-99, 1993.
17. Durall I, Falcon C, Diaz-Bertrana MC, Franch J. Effects of Static and Dynamization after Interlocking Femoral Nailing nLocked with an External Fixator: An Experimental Study in Dogs. Vet Surg 33:323-332, 2004.